Related Resources: gears
Tolerances Coarse-Pitch Spur and Helical Gears
Gear Engineering and Design
Tolerances, Engineering Design & Limits & Fits
Classification and Accuracy Tolerances for Coarse-Pitch Spur and Helical Master Gears per. Specification ANSI/AGMA A88
An inspection master gear is used with selected fixtures to measure the variations in a manufactured gear.
Classification of Master Tolerances; There are Five master gear tolerance classes for coarse pitch gears and four classes for fine pitch (20 and finer). For spur and helical gears, numbered 1 through 5 in order of increasing precision:
Table 1
Master Gear Class Element
Tolerances-Coarse-Pitch
(Diameters 2-6 inch)
| Gear Element | Tolerance (Ten Thousandths) |
||||
Master Gear Class |
|||||
1 |
2 |
3 |
4 |
5 |
|
| Runout over | |||||
| One Pin (FIM) | 5.0 |
4.0 |
3.0 |
2.0 |
1.0 |
| Profile | 3.0 |
2.5 |
2.0 |
1.5 |
1.0 |
| Pitch Variation | 2.0 |
2.0 |
1.5 |
1.0 |
1.0 |
Table 2
Tooth Alignment Tolerance
For All Coarse Pitch Master Gear Classes
Face Width Tolerancea (inches) |
Tolerance (Ten Thousandths) |
1 |
1.0 |
2 |
1.5 |
3 |
2.0 |
4 |
2.5 |
5 |
3.0 |
a An additional 0.0001 inch for end relief is allowed at either end of face; however, 80 percent central face shall be within tolerance shown.
Table 3
Reference Master Gear Class Composite
Tolerances For Coarse-Pitch
(Diameters 2-8.25 inch)
| Composite Action Test | Tolerancea (Ten Thousandths) |
||||
Master Class |
|||||
1 |
2 |
3 |
4 |
5 |
|
| Tooth to Tooth |
3.0 |
2.0 |
1.5 |
1.0 |
0.8 |
| Total | 7.5 |
6.0 |
4.0 |
3.0 |
2.0 |
a Master Gears (coarse pitch) will be qualified by elemental inspection. Qualification by composite method may be requested.
Tooth Thickness Tolerance Range for Master Gears. Two tooth thickness tolerance ranges are recognized, each having a code (Code A and Code B)
Measuring runout using a master gear:
Runout is the maximum variation of the distance between a surface of revolution and a datum surface, measured perpendicular to that datum surface.
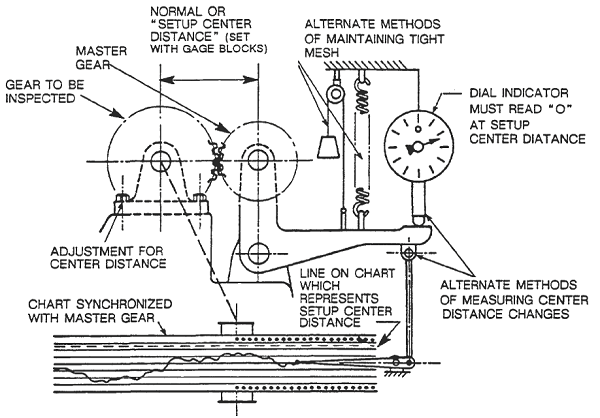
The composite test of a gear, see Fig. 1 & 2 is a method of inspection in which the work gear is rolled in tight double flank contact with a master gear. AGMA defines this type of inspection as “radial composite deviation.” or "Composite Action Test". No backlash is provided, as the work gear is spring loaded against the reference gear on the inspection machine. The composite action test is made on an inspection instrument that will allow variation in the center distance during rolling. This variation in center distance will yield a “tooth-to-tooth” and a “total composite” indication that can be read on a simple dial indicator or recorded graphically.
Composite inspection is a useful shop-friendly tool to determine the general quality of a gear including size, runout, tooth-to-tooth rolling action, and to detect nicks. It is not an appropriate method to determine individual tooth flank errors.

Figure 1 Master Gear Inspection setup - Click on image to enlarge

Figure 2 Composite Action Test for Spur Gears
- Click on image to enlarge
Related:
- AGMA Fine Pitch Tolerances / Quality Grades for Gears
- Specifying AGMA Spur Gear, Helical Gear, and Herringbone Gear Backlash
- Spur and Helical Gear Mechanical Drawing Specifications Requirements
- Spur Gear Generator with Download Spur Gear Generator is unitless: you may choose inches, cm or millimeters when importing your DXF file as you will have the same value for D/P as it is set above or as imported (SI or imperial units).
- Spur Gear and Assembly Builder Spur Gear and Assembly Builder calculates and models individual Spur Gears and Gear assembly. File down loads available with Premium Account.
- Gear Design Handbook Premium Membership Required
- AGMA Spur Gear Profile Calculator Spread Sheet - Three excel calculation sheets that include the following input data/variables, calculated data and chart graphics.
- AGMA Worm and Spur Gear Design Equations and Calculators Worm gear sets are generally rated by their capacity to handle a particular level of input power, output power, or allowable torque at a particular speed for the input or output shaft.
- AGMA Worm gear Equations For Rating Factors Values for the ratio correction factor, the velocity factor, and materials factors can be found from tables provided in the ANSI/AGMA 6034-B92 standard.
ANSI/AGMA American National Standards Institute . American Gear Manufacturers Association