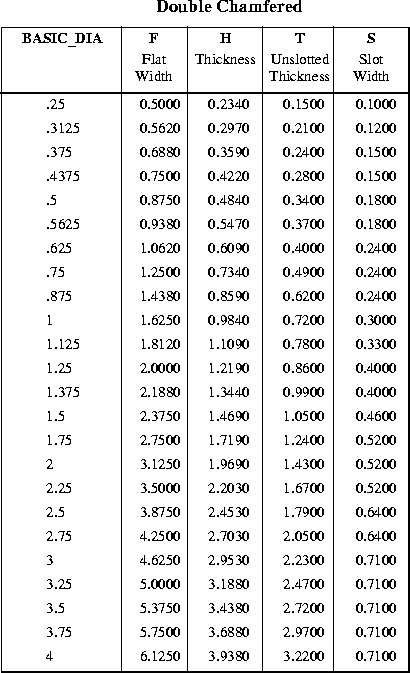
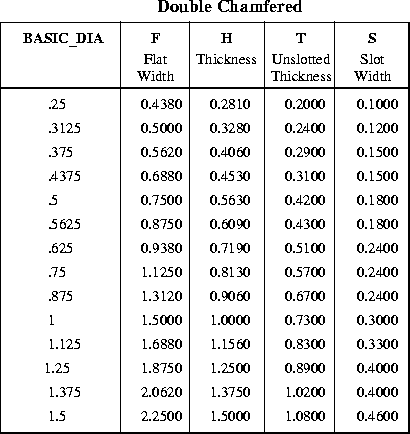
Slotted Hex Nut Size Dimensional Data Table Chart ASME B18.2.2
Hardware ANSI Menu Slotted Hex Nut Size Dimensional Data Table Chart per. ASME B18.2.2. All dimensional data given in inches.
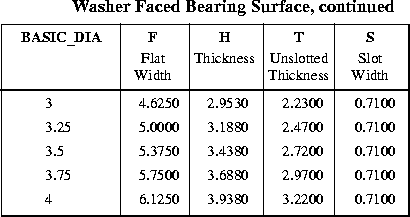
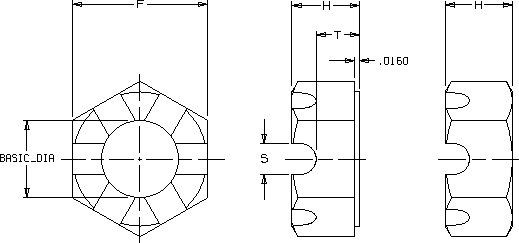
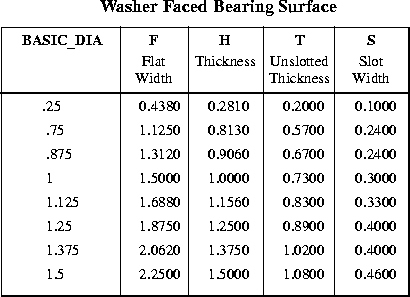
| BASIC Thread Dia. | F Flat Width | H Thickness | T Unslotted Thickness | S Slot Width |
| .25 | 0.4380 | 0.2190 | 0.1400 | 0.1000 |
| .75 | 1.1250 | 0.6410 | 0.4000 | 0.2400 |
| .875 | 1.3120 | 0.7500 | 0.5200 | 0.2400 |
| 1 | 1.5000 | 0.8590 | 0.5900 | 0.3000 |
| 1.125 | 1.6880 | 0.9690 | 0.6400 | 0.3300 |
| 1.25 | 1.8750 | 1.0630 | 0.7000 | 0.4000 |
| 1.375 | 2.0620 | 1.1720 | 0.8200 | 0.4000 |
| 1.5 | 2.2500 | 1.2810 | 0.8600 | 0.4600 |
Heavy Hex Slotted Nut
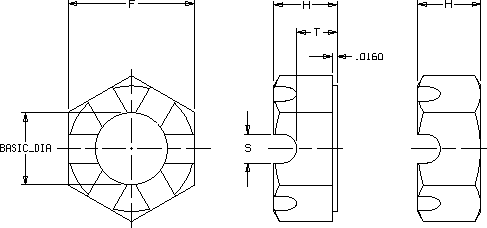
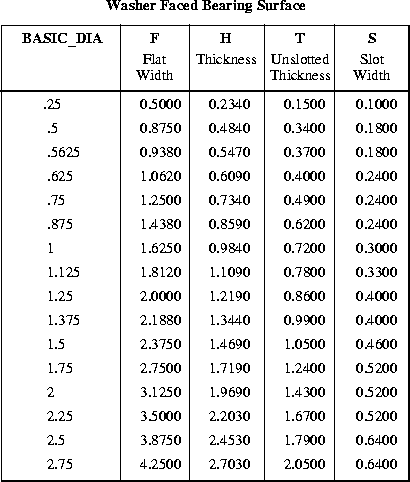
Hex Thick Slotted Nut
GENERAL NOTES:
(a) True Position of Tapped Hole. The axis of tapped hole shall be located at true position with respect to the axis of nut body within a tolerance zone having a diameter equivalent to 4% of the maximum width across flats, regardless of feature size.
(b) Countersink. Tapped hole shall be countersunk on the bearing face or faces. The maximum countersink diameter shall be the thread basic (nominal) major diameter plus 0.030 in. for 3/8 in. nominal sire nuts and smaller, and 1 .O8 times the basic major diameter for nuts larger than 3/8 in. No part of the threaded portion shall project beyond the bearing surface.
(c) Threads. Threads shall be unified coarse, fine, or 8 thread series (UNC, UNF or 8 UN series), Class 28.
(d) Material. Unless otherwise specified, chemical and mechanical properties of steel nuts shall conform with Grade A of ASTM A 563, Carbon and Alloy Steel Nuts; or Grade 2 of SAE J995, Mechanical and Material Requirements for Steel Nuts. Nuts of other materials such as corrosion resistant (stainless) steel, brass, bronze, and aluminum alloys shall have properties as agreed upon between the manufacturer and purchaser.
The properties for nuts of several grades of corrosion resistant steel alloys are covered in ASTM F 594, and of several nonferrous materials in ASTM F 467.
NOTES:
(1) Width Across Flats. Maximum width across flats shall not be exceeded (see exception in General Data). No transverse section through the nut between 25% and 75% of the actual nut thickness as measured from the bearing surface shall be less than the minimum width across flats. For milled-from-bar nuts, see statement in General Data pertaining to the nominal bar size to be used.
(2) Corner Fill. A rounding or lack of fill at junction of hex corners with chamfer shall be permissible provided the width across corners is within specified limits at and beyond a distance equal to 17.5% of the basic thread diameter from the chamfered faces.
(3) Tops and Bearing Surfaces of Nuts. Nuts in sizes in. nominal size and smaller shall be double chamfered. Larger sire nuts shall be double chamfered or have washer faced bearing surface and chamfered top.
The diameter of chamfer circle on double chamfered nuts and diameter of washer face shall be within the limits of the maximum width across flats and 95% of the minimum width across flats.
The tops of washer faced nuts shall be flat and the diameter of chamfer circle shall be equal to the maximum width across flats within a tolerance of - 15%. The length of chamfer at hex corners shall be from 5% to 15% of the basic thread diameter. The surface of chamfer may be slightly convex or rounded.
Bearing surfaces shall be flat and perpendicular to the axis of the threaded hole within the FIM limits specified for the respective strength level.

